

控制台交互
可以根据 __name__ 关键字来判断是否是直接使用 python 命令执行某个脚本,还是外部引用;Google 开源的 fire 也是不错的快速将某个类封装为命令行工具的框架:
import fireclass Calculator(object): """A simple calculator class.""" def double(self, number): return 2 * numberif __name__ == '__main__': fire.Fire(Calculator)# python calculator.py double 10 # 20# python calculator.py double --number=15 # 30
模块
Python 中的模块(Module)即是 Python 源码文件,其可以导出类、函数与全局变量;当我们从某个模块导入变量时,函数名往往就是命名空间(Namespace)。而 Python 中的包(Package)则是模块的文件夹,往往由 __init__.py 指明某个文件夹为包:
Package 可以为某个目录下所有的文件设置统一入口:
someDir/ main.py subModules/ __init__.py subA.py subSubModules/ __init__.py subSubA.py# subA.pydef subAFun(): print('Hello from subAFun') def subAFunTwo(): print('Hello from subAFunTwo')# subSubA.pydef subSubAFun(): print('Hello from subSubAFun') def subSubAFunTwo(): print('Hello from subSubAFunTwo')# __init__.py from subDir# Adds 'subAFun()' and 'subAFunTwo()' to the 'subDir' namespace from .subA import *# The following two import statement do the same thing, they add 'subSubAFun()' and 'subSubAFunTwo()' to the 'subDir' namespace. The first one assumes '__init__.py' is empty in 'subSubDir', and the second one, assumes '__init__.py' in 'subSubDir' contains 'from .subSubA import *'.# Assumes '__init__.py' is empty in 'subSubDir'# Adds 'subSubAFun()' and 'subSubAFunTwo()' to the 'subDir' namespacefrom .subSubDir.subSubA import *# Assumes '__init__.py' in 'subSubDir' has 'from .subSubA import *'# Adds 'subSubAFun()' and 'subSubAFunTwo()' to the 'subDir' namespacefrom .subSubDir import *# __init__.py from subSubDir# Adds 'subSubAFun()' and 'subSubAFunTwo()' to the 'subSubDir' namespacefrom .subSubA import *# main.pyimport subDirsubDir.subAFun() # Hello from subAFunsubDir.subAFunTwo() # Hello from subAFunTwosubDir.subSubAFun() # Hello from subSubAFunsubDir.subSubAFunTwo() # Hello from subSubAFunTwo
循环遍历
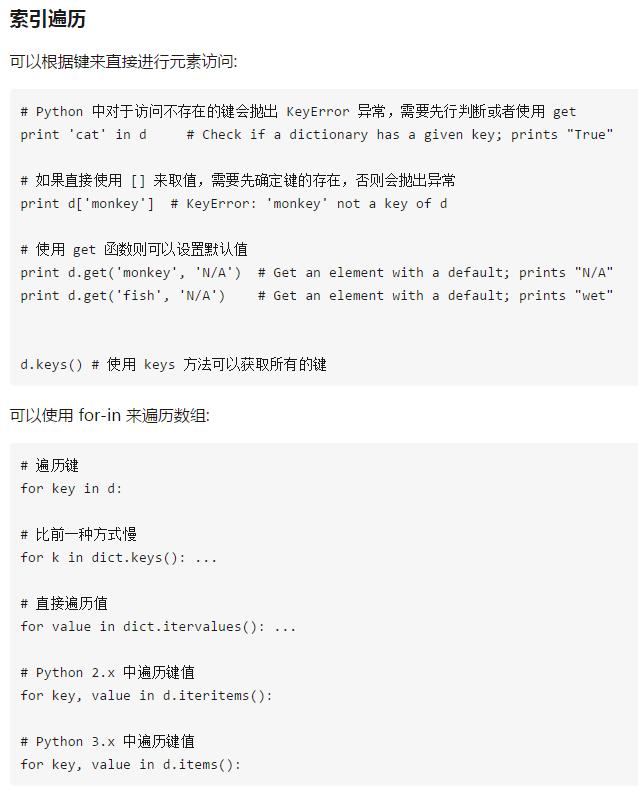
for-in 可以用来遍历数组与字典:
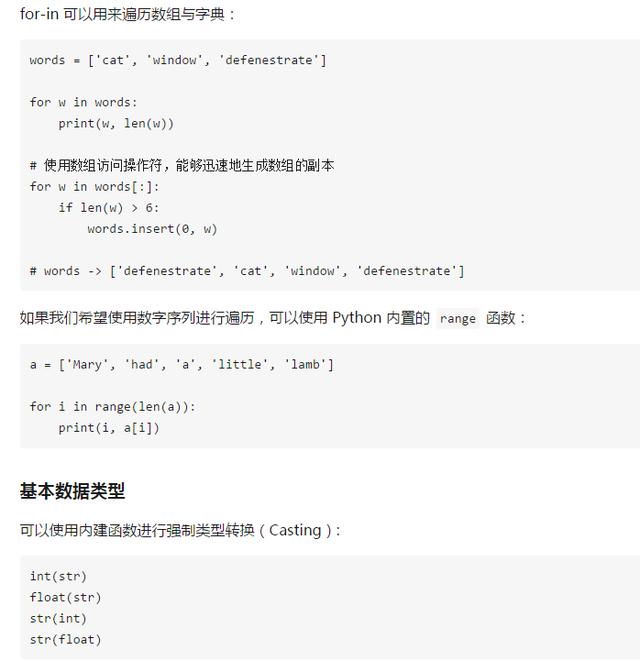
Number: 数值类型
x = 3print type(x) # Prints "<type 'int'>"print x # Prints "3"print x + 1 # Addition; prints "4"print x - 1 # Subtraction; prints "2"print x * 2 # Multiplication; prints "6"print x ** 2 # Exponentiation; prints "9"x += 1print x # Prints "4"x *= 2print x # Prints "8"y = 2.5print type(y) # Prints "<type 'float'>"print y, y + 1, y * 2, y ** 2 # Prints "2.5 3.5 5.0 6.25"
Python 字符串支持分片、模板字符串等常见操作:
var1 = 'Hello World!'var2 = "Python Programming"print "var1[0]: ", var1[0]print "var2[1:5]: ", var2[1:5]# var1[0]: H# var2[1:5]: ythoprint "My name is %s and weight is %d kg!" % ('Zara', 21)# My name is Zara and weight is 21 kg!str[0:4]len(str)string.replace("-", " ")",".join(list)"hi {0}".format('j')str.find(",")str.index(",") # same, but raises IndexErrorstr.count(",")str.split(",")str.lower()str.upper()str.title()str.lstrip()str.rstrip()str.strip()str.islower()# 移除所有的特殊字符re.sub('[^A-Za-z0-9]+', '', mystring)

集合类型
List: 列表
Operation: 创建增删
list 是基础的序列类型:
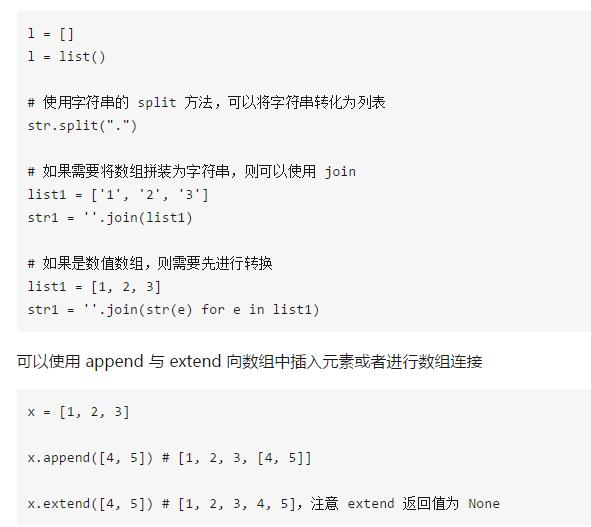
可以使用 pop、slices、del、remove 等移除列表中元素:
myList = [10,20,30,40,50]# 弹出第二个元素myList.pop(1) # 20# myList: myList.pop(1)# 如果不加任何参数,则默认弹出最后一个元素myList.pop()# 使用 slices 来删除某个元素a = [ 1, 2, 3, 4, 5, 6 ]index = 3 # Only Positive indexa = a[:index] + a[index+1 :]# 根据下标删除元素myList = [10,20,30,40,50]rmovIndxNo = 3del myList[rmovIndxNo] # myList: [10, 20, 30, 50]# 使用 remove 方法,直接根据元素删除letters = ["a", "b", "c", "d", "e"]numbers.remove(numbers[1])print(*letters) # used a * to make it unpack you don't have to

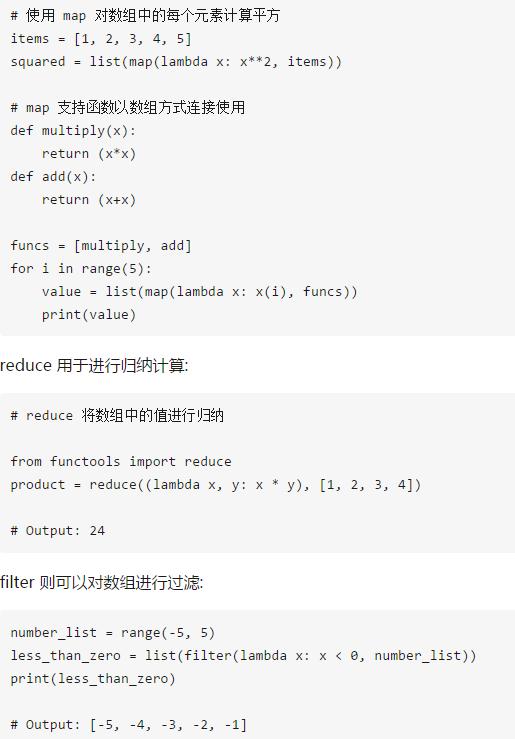
Comprehensions: 变换
Python 中同样可以使用 map、reduce、filter,map 用于变换数组:
字典类型
创建增删
d = {'cat': 'cute', 'dog': 'furry'} # 创建新的字典print d['cat'] # 字典不支持点(Dot)运算符取值
如果需要合并两个或者多个字典类型:
# python 3.5z = {**x, **y}# python 2.7def merge_dicts(*dict_args): """ Given any number of dicts, shallow copy and merge into a new dict, precedence goes to key value pairs in latter dicts. """ result = {} for dictionary in dict_args: result.update(dictionary) return result
其他序列类型
集合
# Same as {"a", "b","c"}normal_set = set(["a", "b","c"]) # Adding an element to normal set is finenormal_set.add("d") print("Normal Set")print(normal_set) # A frozen setfrozen_set = frozenset(["e", "f", "g"]) print("Frozen Set")print(frozen_set) # Uncommenting below line would cause error as# we are trying to add element to a frozen set# frozen_set.add("h")
函数
函数定义
Python 中的函数使用 def 关键字进行定义,譬如:
def sign(x): if x > 0: return 'positive' elif x < 0: return 'negative' else: return 'zero'for x in [-1, 0, 1]: print sign(x)# Prints "negative", "zero", "positive"
Python 支持运行时创建动态函数,也即是所谓的 lambda 函数:
def f(x): return x**2# 等价于g = lambda x: x**2
参数
Option Arguments: 不定参数
def example(a, b=None, *args, **kwargs): print a, b print args print kwargsexample(1, "var", 2, 3, word="hello")# 1 var# (2, 3)# {'word': 'hello'}a_tuple = (1, 2, 3, 4, 5)a_dict = {"1":1, "2":2, "3":3}example(1, "var", *a_tuple, **a_dict)# 1 var# (1, 2, 3, 4, 5)# {'1': 1, '2': 2, '3': 3}
生成器
def simple_generator_function(): yield 1 yield 2 yield 3for value in simple_generator_function(): print(value)# 输出结果# 1# 2# 3our_generator = simple_generator_function()next(our_generator)# 1next(our_generator)# 2next(our_generator)#3# 生成器典型的使用场景譬如无限数组的迭代def get_primes(number): while True: if is_prime(number): yield number number += 1
装饰器
装饰器是非常有用的设计模式:
# 简单装饰器from functools import wrapsdef decorator(func): @wraps(func) def wrapper(*args, **kwargs): print('wrap function') return func(*args, **kwargs) return wrapper@decoratordef example(*a, **kw): passexample.__name__ # attr of function preserve# 'example'# Decorator # 带输入值的装饰器from functools import wrapsdef decorator_with_argument(val): def decorator(func): @wraps(func) def wrapper(*args, **kwargs): print "Val is {0}".format(val) return func(*args, **kwargs) return wrapper return decorator@decorator_with_argument(10)def example(): print "This is example function."example()# Val is 10# This is example function.# 等价于def example(): print "This is example function."example = decorator_with_argument(10)(example)example()# Val is 10# This is example function.
类方法与静态方法
class example(object): @classmethod def clsmethod(cls): print "I am classmethod" @staticmethod def stmethod(): print "I am staticmethod" def instmethod(self): print "I am instancemethod"ex = example()ex.clsmethod()# I am classmethodex.stmethod()# I am staticmethodex.instmethod()# I am instancemethodexample.clsmethod()# I am classmethodexample.stmethod()# I am staticmethodexample.instmethod()# Traceback (most recent call last):# File "", line 1, in# TypeError: unbound method instmethod() ...
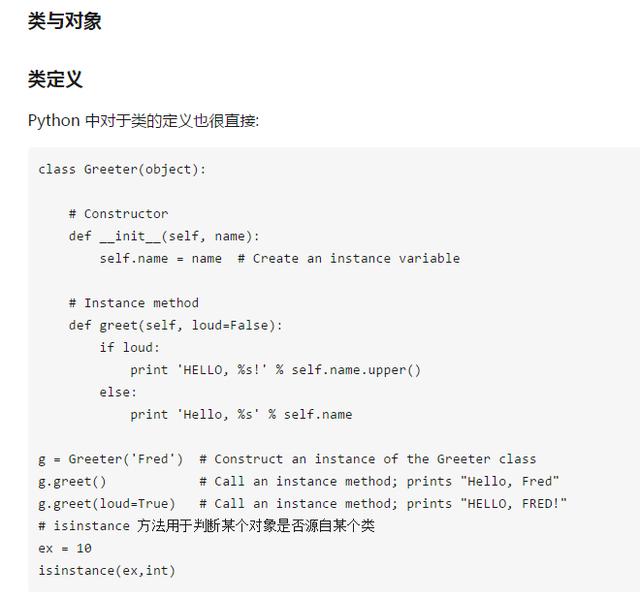
对象
实例化
属性操作
Python 中对象的属性不同于字典键,可以使用点运算符取值,直接使用 in 判断会存在问题:
class A(object): @property def prop(self): return 3a = A()print "'prop' in a.__dict__ =", 'prop' in a.__dict__print "hasattr(a, 'prop') =", hasattr(a, 'prop')print "a.prop =", a.prop# 'prop' in a.__dict__ = False# hasattr(a, 'prop') = True# a.prop = 3
建议使用 hasattr、getattr、setattr 这种方式对于对象属性进行操作:
class Example(object): def __init__(self): self.name = "ex" def printex(self): print "This is an example"# Check object has attributes# hasattr(obj, 'attr')ex = Example()hasattr(ex,"name")# Truehasattr(ex,"printex")# Truehasattr(ex,"print")# False# Get object attribute# getattr(obj, 'attr')getattr(ex,'name')# 'ex'# Set object attribute# setattr(obj, 'attr', value)setattr(ex,'name','example')ex.name# 'example'
异常与测试
异常处理
Context Manager - with
with 常用于打开或者关闭某些资源:
host = 'localhost'port = 5566with Socket(host, port) as s: while True: conn, addr = s.accept() msg = conn.recv(1024) print msg conn.send(msg) conn.close()
单元测试
from __future__ import print_functionimport unittestdef fib(n): return 1 if n<=2 else fib(n-1)+fib(n-2)def setUpModule(): print("setup module")def tearDownModule(): print("teardown module")class TestFib(unittest.TestCase): def setUp(self): print("setUp") self.n = 10 def tearDown(self): print("tearDown") del self.n @classmethod def setUpClass(cls): print("setUpClass") @classmethod def tearDownClass(cls): print("tearDownClass") def test_fib_assert_equal(self): self.assertEqual(fib(self.n), 55) def test_fib_assert_true(self): self.assertTrue(fib(self.n) == 55)if __name__ == "__main__": unittest.main()
存储
文件读写
路径处理
Python 内置的 __file__ 关键字会指向当前文件的相对路径,可以根据它来构造绝对路径,或者索引其他文件:
# 获取当前文件的相对目录dir = os.path.dirname(__file__) # srcapp## once you're at the directory level you want, with the desired directory as the final path node:dirname1 = os.path.basename(dir) dirname2 = os.path.split(dir)[1] ## if you look at the documentation, this is exactly what os.path.basename does.# 获取当前代码文件的绝对路径,abspath 会自动根据相对路径与当前工作空间进行路径补全os.path.abspath(os.path.dirname(__file__)) # D:WorkSpaceOWS ool\ui-tool-svnpythonsrcapp# 获取当前文件的真实路径os.path.dirname(os.path.realpath(__file__)) # D:WorkSpaceOWS ool\ui-tool-svnpythonsrcapp# 获取当前执行路径os.getcwd()
可以使用 listdir、walk、glob 模块来进行文件枚举与检索:
# 仅列举所有的文件from os import listdirfrom os.path import isfile, joinonlyfiles = [f for f in listdir(mypath) if isfile(join(mypath, f))]# 使用 walk 递归搜索from os import walkf = []for (dirpath, dirnames, filenames) in walk(mypath): f.extend(filenames) break# 使用 glob 进行复杂模式匹配import globprint(glob.glob("/home/adam/*.txt"))# ['/home/adam/file1.txt', '/home/adam/file2.txt', .... ]
简单文件读写
# 可以根据文件是否存在选择写入模式mode = 'a' if os.path.exists(writepath) else 'w'# 使用 with 方法能够自动处理异常with open("file.dat",mode) as f: f.write(...) ... # 操作完毕之后记得关闭文件 f.close()# 读取文件内容message = f.read()
复杂格式文件
JSON
import json# Writing JSON datawith open('data.json', 'w') as f: json.dump(data, f)# Reading data backwith open('data.json', 'r') as f: data = json.load(f)
XML
我们可以使用 lxml 来解析与处理 XML 文件,本部分即对其常用操作进行介绍。lxml 支持从字符串或者文件中创建 Element 对象:
from lxml import etree# 可以从字符串开始构造xml = '<a xmlns="test"><b xmlns="test"/></a>'root = etree.fromstring(xml)etree.tostring(root)# b'<a xmlns="test"><b xmlns="test"/></a>'# 也可以从某个文件开始构造tree = etree.parse("doc/test.xml")# 或者指定某个 baseURLroot = etree.fromstring(xml, base_url="http://where.it/is/from.xml")
其提供了迭代器以对所有元素进行遍历:
# 遍历所有的节点for tag in tree.iter(): if not len(tag): print tag.keys() # 获取所有自定义属性 print (tag.tag, tag.text) # text 即文本子元素值# 获取 XPathfor e in root.iter(): print tree.getpath(e)
lxml 支持以 XPath 查找元素,不过需要注意的是,XPath 查找的结果是数组,并且在包含命名空间的情况下,需要指定命名空间:
root.xpath('//page/text/text()',ns={prefix:url})# 可以使用 getparent 递归查找父元素el.getparent()
lxml 提供了 insert、append 等方法进行元素操作:
# append 方法默认追加到尾部st = etree.Element("state", name="New Mexico")co = etree.Element("county", name="Socorro")st.append(co)# insert 方法可以指定位置node.insert(0, newKid)
Excel
可以使用 [xlrd]() 来读取 Excel 文件,使用 xlsxwriter 来写入与操作 Excel 文件。
# 读取某个 Cell 的原始值sh.cell(rx, col).value# 创建新的文件workbook = xlsxwriter.Workbook(outputFile)worksheet = workbook.add_worksheet()# 设置从第 0 行开始写入row = 0# 遍历二维数组,并且将其写入到 Excel 中for rowData in array: for col, data in enumerate(rowData): worksheet.write(row, col, data) row = row + 1workbook.close()
文件系统
对于高级的文件操作,我们可以使用 Python 内置的 shutil
# 递归删除 appName 下面的所有的文件夹shutil.rmtree(appName)
网络交互
Requests
Requests 是优雅而易用的 Python 网络请求库:
import requestsr = requests.get('https://api.github.com/events')r = requests.get('https://api.github.com/user', auth=('user', 'pass'))r.status_code# 200r.headers['content-type']# 'application/json; charset=utf8'r.encoding# 'utf-8'r.text# u'{"type":"User"...'r.json()# {u'private_gists': 419, u'total_private_repos': 77, ...}r = requests.put('http://httpbin.org/put', data = {'key':'value'})r = requests.delete('http://httpbin.org/delete')r = requests.head('http://httpbin.org/get')r = requests.options('http://httpbin.org/get')
数据存储
MySQL
import pymysql.cursors# Connect to the databaseconnection = pymysql.connect(host='localhost', user='user', password='passwd', db='db', charset='utf8mb4', cursorclass=pymysql.cursors.DictCursor)try: with connection.cursor() as cursor: # Create a new record sql = "INSERT INTO `users` (`email`, `password`) VALUES (%s, %s)" cursor.execute(sql, ('webmaster@python.org', 'very-secret')) # connection is not autocommit by default. So you must commit to save # your changes. connection.commit() with connection.cursor() as cursor: # Read a single record sql = "SELECT `id`, `password` FROM `users` WHERE `email`=%s" cursor.execute(sql, ('webmaster@python.org',)) result = cursor.fetchone() print(result)finally: connection.close()
私信小编01即可获取神秘大礼包!

每天进步一点点! - 51开心Go阅读网网络转载,经零妖贰捌整理后发布(声明:本站所有文章仅供学习,版权归原作者所有;若有侵权,请联系在线客服进行删除,文章链接:https://www.51kxg.com/archives/84。)